![]()
![]()
![]()
![]()
![]()
Other Great! Websites:
![]()
![]()
DHTMLGoodies.com
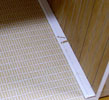
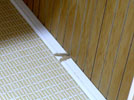
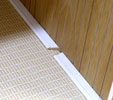
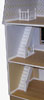 I am putting the J-FK finishing kit in a JM907 - here are some photos.
J-FK/28D.jpg
I am putting the J-FK finishing kit in a JM907 - here are some photos.
J-FK/28D.jpg
I am putting the J-FK finishing kit in a JM907 - here are some photos.
J-FK/28D.jpg
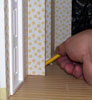
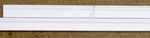
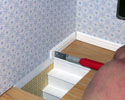
DHTMLGoodies.com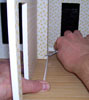 Baseboard: I started in the Tower Front - a hard place to accurately measure. I have already put the 45* miter in the front corner, and I am holding the baseboard stock in place to mark the back edge for the inside of this corner's miter
J-FK/00D.jpg
Baseboard: I started in the Tower Front - a hard place to accurately measure. I have already put the 45* miter in the front corner, and I am holding the baseboard stock in place to mark the back edge for the inside of this corner's miter
J-FK/00D.jpg
Baseboard: I started in the Tower Front - a hard place to accurately measure. I have already put the 45* miter in the front corner, and I am holding the baseboard stock in place to mark the back edge for the inside of this corner's miter
J-FK/00D.jpg
DHTMLGoodies.com
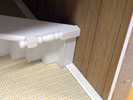
 2. A little 'lite' spackle in a under-cut corner fills it from the inside
J-FK/02D.jpg
2. A little 'lite' spackle in a under-cut corner fills it from the inside
J-FK/02D.jpg
2. A little 'lite' spackle in a under-cut corner fills it from the inside
J-FK/02D.jpg

DHTMLGoodies.com
 4. Finish everything behind the Blind Dividers before putting them in - including sanding and touch-up paint...
AND including the Crown Molding
J-FK/04D.jpg
4. Finish everything behind the Blind Dividers before putting them in - including sanding and touch-up paint...
AND including the Crown Molding
J-FK/04D.jpg
4. Finish everything behind the Blind Dividers before putting them in - including sanding and touch-up paint...
AND including the Crown Molding
J-FK/04D.jpg
DHTMLGoodies.com
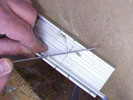
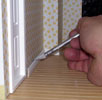 6. Cut the back edge miter first, then put the baseboard stock in place and transfer the mark from the wall to the baseboard
J-FK/06D.jpg
6. Cut the back edge miter first, then put the baseboard stock in place and transfer the mark from the wall to the baseboard
J-FK/06D.jpg
6. Cut the back edge miter first, then put the baseboard stock in place and transfer the mark from the wall to the baseboard
J-FK/06D.jpg


DHTMLGoodies.com
 10. Every Baseboard piece is a template for a Crown piece, and I am installing them at the same time.
J-FK/10D.jpg
10. Every Baseboard piece is a template for a Crown piece, and I am installing them at the same time.
J-FK/10D.jpg
10. Every Baseboard piece is a template for a Crown piece, and I am installing them at the same time.
J-FK/10D.jpg
DHTMLGoodies.com
 11. I'll cut and fit the paper before installing the Attic Divider or the Rooftop
J-FK/11D.jpg
11. I'll cut and fit the paper before installing the Attic Divider or the Rooftop
J-FK/11D.jpg
11. I'll cut and fit the paper before installing the Attic Divider or the Rooftop
J-FK/11D.jpg
DHTMLGoodies.com
 12. I need one more long piece of Baseboard. I made matching miters and am gluing two shorts together to make one long.
J-FK/12D.jpg
12. I need one more long piece of Baseboard. I made matching miters and am gluing two shorts together to make one long.
J-FK/12D.jpg
12. I need one more long piece of Baseboard. I made matching miters and am gluing two shorts together to make one long.
J-FK/12D.jpg
DHTMLGoodies.com
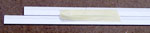 13. I taped the 'joined' Baseboard to a straight Baseboard piece to keep it straight
J-FK/13D.jpg
13. I taped the 'joined' Baseboard to a straight Baseboard piece to keep it straight
J-FK/13D.jpg
13. I taped the 'joined' Baseboard to a straight Baseboard piece to keep it straight
J-FK/13D.jpg
DHTMLGoodies.com
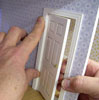 14. 1015 Doors are pinned top and bottom; disassembly for painting is easy. See the link at right for details of installing the trim.
J-FK/14D.jpg
14. 1015 Doors are pinned top and bottom; disassembly for painting is easy. See the link at right for details of installing the trim.
J-FK/14D.jpg
14. 1015 Doors are pinned top and bottom; disassembly for painting is easy. See the link at right for details of installing the trim.
J-FK/14D.jpg
DHTMLGoodies.com
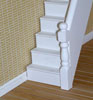
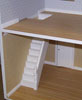
 15. J-FK Stair Sides: Using this Stair Side means NOT using the kit's Stair Stringer
J-FK/15D.jpg
15. J-FK Stair Sides: Using this Stair Side means NOT using the kit's Stair Stringer
J-FK/15D.jpg
15. J-FK Stair Sides: Using this Stair Side means NOT using the kit's Stair Stringer
J-FK/15D.jpg
DHTMLGoodies.com
 16. I forgot to mark and cut the Baseboard before I glued it on. I'll cut it in place.
J-FK/16D.jpg
16. I forgot to mark and cut the Baseboard before I glued it on. I'll cut it in place.
J-FK/16D.jpg
16. I forgot to mark and cut the Baseboard before I glued it on. I'll cut it in place.
J-FK/16D.jpg
DHTMLGoodies.com
 17. The house is on its side on a thick pad. The stairs are traced onto the baseboard with the point of an X-Acto knife (no pencil mark!).
J-FK/17D.jpg
17. The house is on its side on a thick pad. The stairs are traced onto the baseboard with the point of an X-Acto knife (no pencil mark!).
J-FK/17D.jpg
17. The house is on its side on a thick pad. The stairs are traced onto the baseboard with the point of an X-Acto knife (no pencil mark!).
J-FK/17D.jpg
DHTMLGoodies.com
 18. Little straight-cuts, then clearing-cuts - then another straight-cut... etc
J-FK/18D.jpg
18. Little straight-cuts, then clearing-cuts - then another straight-cut... etc
J-FK/18D.jpg
18. Little straight-cuts, then clearing-cuts - then another straight-cut... etc
J-FK/18D.jpg
DHTMLGoodies.com
 19. A little at a time and there's no slipping, no gouging, nothing broken...
J-FK/19D.jpg
19. A little at a time and there's no slipping, no gouging, nothing broken...
J-FK/19D.jpg
19. A little at a time and there's no slipping, no gouging, nothing broken...
J-FK/19D.jpg
DHTMLGoodies.com
 23. I did remember the upper stairs before I glued in the baseboard. No baseboard behind the stairs though.. that's for the Landing Rails
J-FK/23D.jpg
23. I did remember the upper stairs before I glued in the baseboard. No baseboard behind the stairs though.. that's for the Landing Rails
J-FK/23D.jpg
23. I did remember the upper stairs before I glued in the baseboard. No baseboard behind the stairs though.. that's for the Landing Rails
J-FK/23D.jpg
DHTMLGoodies.com
 24. This house needs an extra Newel on the top floor. I wil get it here and make the Landing Rail fit better too.
J-FK/24D.jpg
24. This house needs an extra Newel on the top floor. I wil get it here and make the Landing Rail fit better too.
J-FK/24D.jpg
24. This house needs an extra Newel on the top floor. I wil get it here and make the Landing Rail fit better too.
J-FK/24D.jpg

DHTMLGoodies.com
 26. And here's my extra Newel. I cut gently all the way around the rail before I cut it off to prevent damage to the Newel
J-FK/26D.jpg
26. And here's my extra Newel. I cut gently all the way around the rail before I cut it off to prevent damage to the Newel
J-FK/26D.jpg
26. And here's my extra Newel. I cut gently all the way around the rail before I cut it off to prevent damage to the Newel
J-FK/26D.jpg


DHTMLGoodies.com
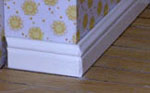
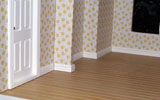
 30. The attic uses regular Baseboard (not the 'Kneewall' - that's for colonial houses)
J-FK/30D.jpg
30. The attic uses regular Baseboard (not the 'Kneewall' - that's for colonial houses)
J-FK/30D.jpg
30. The attic uses regular Baseboard (not the 'Kneewall' - that's for colonial houses)
J-FK/30D.jpg
